
Between 75 and 85% of people will experience a lower back episode in their lifetime. Most cases resolve within two to four weeks, but some turn into persistent pain that limits your daily activities. If you're dealing with back pain, you've probably heard conflicting advice about rest versus movement.
We work with clients every day who are frustrated by failed treatments and worried about making their pain worse. The good news? Movement-based rehabilitation works better than rest for most back injuries. Our kinesiologists use assessment techniques to discover the root of your back pain and treat it with specific exercises that restore your movement patterns, reduce pain, and rebuild the foundations of how your body moves.
Read on to learn why movement beats rest for back recovery, the seven core exercises we use with our clients, and when to get professional help. These exercises follow a proven progression from acute pain relief through strength building. You'll also learn which phase you're in and how to avoid setbacks that slow your recovery.
What Are the Best Back Rehabilitation Exercises?
The eight most effective back rehabilitation exercises are:
- Pelvic Tilts – Restore lumbar spine mobility and activate deep core muscles in the early acute phase.
- Cat-Cow Stretches – Improve full spine flexibility and help disc hydration through gentle movement.
- Bird Dogs – Build core stability by strengthening your transverse abdominis and multifidus muscles.
- Glute Bridges – Activate your posterior chain to protect your back during daily activities.
- Dead Bugs – Develop anti-extension core control while keeping your spine in a safe neutral position.
- Superman Holds – Strengthen back extensors and lower traps after you've built a solid foundation.
- Wall Sits – Build functional endurance in your quads, glutes, and spinal stabilizers for real-world tasks.
- Side Planks - Work obliques, glute medius and more generally lateral muscles to build lateral stability and strength.
What Is Back Rehabilitation and Why Does It Work?
Back rehabilitation restores movement patterns and mobility in your spine while reducing pain so you can move better. When you sprain your back from lifting or twisting, old advice says to rest. But resting actually makes your muscles weaker.
Your body needs proper loading to understand how to heal correctly. When you have an injury, scar tissue forms in disorganized directions. Movement and slow progressive loading help your body understand the direction of load. This tells your muscles which direction to lay down healing fibers. "You need to move in order to tell the muscles which direction to lay down the fibers," explains Dasha, our clinical kinesiologist.
This doesn't mean you should run to the gym and do heavy deadlifts right away. But doing movement and activation exercises will help you recover faster than resting.
Most back sprains and strains follow a four to eight week timeline. In our clinic, we typically see mobility improvements in the first two to three sessions. If your pain continues beyond eight weeks, other factors may be involved. These can include compensation patterns, nerve involvement, severe strength deficits, emotions or stress that keeps you stuck. Getting professional assessment sooner rather than later helps identify what's holding back your recovery.
The 3 Phases of Back Rehabilitation (And Where These Exercises Fit)
Back rehabilitation follows three distinct phases. Each phase builds on the previous one to rebuild your movement foundations.
Phase 1: Acute (Days 1–7)
This is when your injury is fresh and pain is highest. You'll focus on gentle mobility and pain reduction. Exercises 1 and 2 (pelvic tilts and cat-cow stretches) belong in this phase. They restore basic spine movement without overloading injured tissue.
Phase 2: Subacute (Weeks 2–6)
Pain starts to decrease and you can handle more movement. This phase rebuilds your core stability and activates muscles that protect your back. Exercises 3, 4, and 5 (bird dogs, glute bridges, and dead bugs) fit here. They teach your body proper movement patterns and prevent compensation.
Phase 3: Strengthening (Weeks 6+)
You're moving well with minimal pain. Now you build strength and endurance for daily activities. Exercises 6, 7 and 8 (superman holds, wall sits and side planks) come into play. They prepare you for real-world demands on your back.
Phasing matters because jumping ahead creates setbacks. "You don't want to jump into anything that's too fast too soon, because that can actually make your pain worse," says Dasha. When you have an injury, certain muscles get tight and others get weak. Your body mechanics get disrupted. Taking it phase by phase ensures you're rebuilding proper foundations. You avoid compensation patterns and get to the root cause of your movement dysfunction instead of applying band-aids.
Exercise 1 – Pelvic Tilts (Foundational Mobility)
Pelvic tilts restore gentle movement to your lumbar spine while activating deep core muscles. This exercise is safe enough for the acute phase when your back is most sensitive.
What it targets: Lumbar spine mobility and deep core stabilizers
How to perform pelvic tilts:
Lie on your back with knees bent and feet flat on the floor. Keep your arms relaxed at your sides. Gently tilt your pelvis to flatten your lower back against the floor. Hold for one-two seconds. Then tilt your pelvis the opposite direction to create a small arch under your lower back. Hold for one-two seconds. This is one complete cycle. Try to relax and only move in the range of motion that feels comfortable, so you can breath smoothly.
Perform 10 to 15 tilts for 2 to 3 sets daily.
Common mistakes and pro tips:
The movement comes from your glutes alone, try to not use your core, back, or hip flexors. Keep the motion small and controlled. If you feel sharp pain, reduce your range of motion. Some muscle discomfort is normal, but sharp or shooting pain means you're pushing too hard.
We use this exercise as a way to build comfort and ease with movement of the spine.
Exercise 2 – Cat-Cow Stretches (Spinal Segmentation)
Cat-cow stretches improve flexibility through your entire spine. This exercise also helps disc hydration by creating a pumping effect that brings nutrients into your spinal discs.
What it targets: Full spine flexibility and disc health
How to perform cat-cow stretches:
Start on your hands and knees. Place your hands directly under your shoulders and knees under your hips. Begin the cow position by dropping your belly toward the floor. Lift your chest and tailbone toward the ceiling. Let your back arch gently. Hold for one-two seconds. Move into cat position by rounding your spine toward the ceiling. Tuck your chin to your chest and your tailbone under. Hold for one-two seconds. This is one complete cycle. Breath in and out comfortably as you move.
Perform 8 to 10 cycles for 2 sets daily.
Why it works:
Movement pumps fluid into your spinal discs. Your discs don't have direct blood supply, so they rely on movement to get nutrients. The alternating flexion and extension creates pressure changes that draw fluid in and out. This keeps your discs healthy and helps them heal.
Keep your movements slow and smooth. Don't force your spine into extreme positions. You should feel a gentle stretch, not sharp pain. Focus on moving one vertebra at a time from your tailbone to your neck.
Exercise 3 – Bird Dogs (Core Stability Foundation)
Bird dogs build core stability by teaching your deep stabilizers to work together. This exercise belongs in the subacute phase when you're ready to challenge your balance and coordination.
What it targets: Transverse abdominis and multifidus (deep core stabilizers)
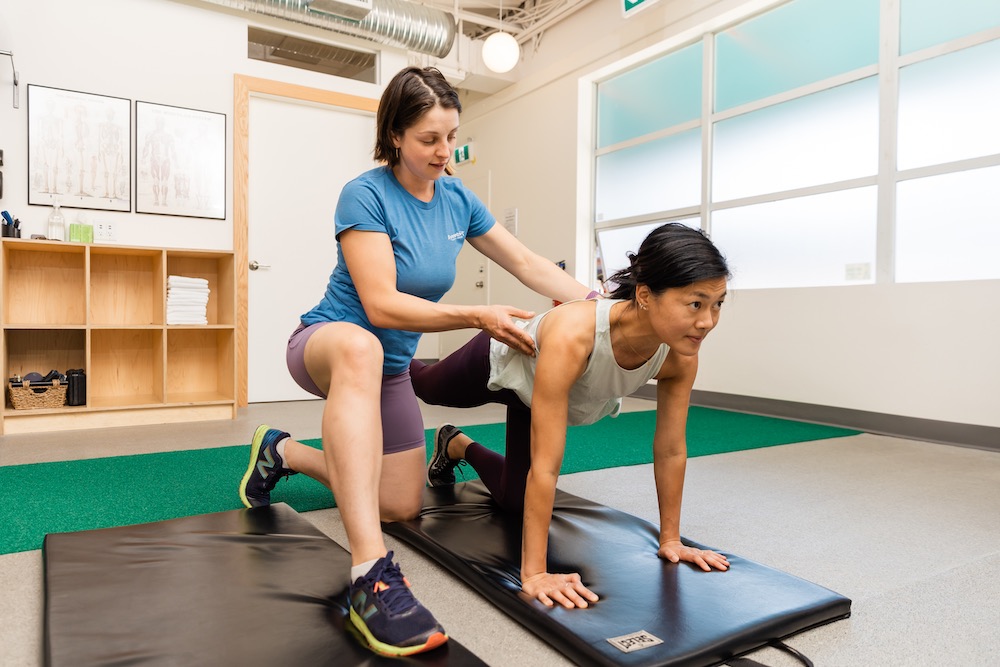
How to perform bird dogs:
Start on your hands and knees with a neutral spine. Engage your core by drawing your belly button gently toward your spine. Extend your right arm forward and your left leg back at the same time. Keep your hips level and spine neutral. Hold for 5 to 10 seconds. Return to the starting position with control. Repeat on the opposite side (left arm, right leg). This completes one full cycle.
Perform 6 to 8 repetitions per side for 2 to 3 sets, 3 to 4 times weekly.
Progression options:
Start with just arm lifts if the full movement is too hard. Once that feels stable, add the leg. You can also hold the position longer (up to 15 seconds) or add light resistance bands around your wrists and ankles.
Common mistakes:
Don't let your hips rotate or drop. Your lower back should not arch, your torson shouldn’t move at all as your leg and arms are moving. Keep your head in line with your spine. Move slowly and with control rather than rushing through repetitions.
Exercise 4 – Glute Bridges (Posterior Chain Activation)
Glute bridges activate your posterior chain muscles that support and protect your lower back. Weak glutes force your back to work harder during daily activities like walking, lifting, and standing.
What it targets: Glutes, hamstrings, and erector spinae
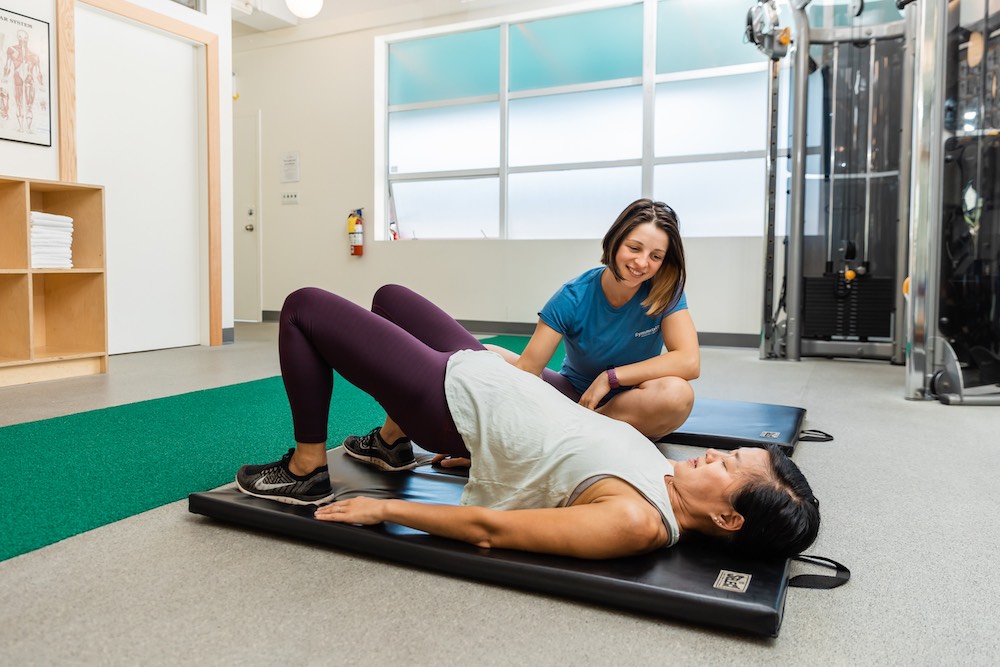
How to perform glute bridges:
Lie on your back with knees bent and feet flat on the floor. Position your feet hip-width apart. Keep your arms relaxed at your sides. Press through your heels and lift your hips toward the ceiling. Your body should form a straight line from shoulders to knees. Squeeze your glutes at the top. Hold for 2 seconds. Lower your hips back down with control. Don't let your back arch at the top of the movement.
Perform 12 to 15 repetitions for 3 sets, 3 times weekly.
Why glutes protect your back:
Your glutes are designed to handle hip extension and load during bending and lifting. When they're weak or not activating properly, your lower back compensates by taking on extra work. This overloads your spinal muscles and can lead to pain. Strengthening your glutes reduces the demand on your back during everyday movements.
Focus on feeling the work in your glutes, not your hamstrings or lower back. If you feel cramping in your hamstrings, bring your feet slightly closer to your body, or don’t lift as high yet.
Exercise 5 – Dead Bugs (Anti-Extension Core Control)
Dead bugs teach your core to resist unwanted spine movement. This anti-extension control protects your back when you reach, carry objects, or perform overhead tasks.
What it targets: Rectus abdominis and obliques (Core bracing more generally)
How to perform dead bugs:
Lie on your back with arms extended straight up toward the ceiling. Lift your legs so your knees are bent at 90 degrees above your hips. Press your lower back flat against the floor, or keep it very slightly arched. Slowly lower your right arm overhead while straightening your left leg. Keep your lower back not moving at all throughout the movement. Return to the starting position. Repeat on the opposite side (left arm, right leg). This completes one full cycle.
Perform 8 to 10 repetitions per side for 2 to 3 sets, 3 times weekly.
Key cue: Keep your back not moving at all
This is the most important part of the exercise. The moment your lower back arches excessively, you've lost core control. If this happens, reduce your range of motion. Lower your arm and leg only as far as you can while keeping your back still. As you get stronger, you'll be able to move further.
Breathe normally throughout the movement. Don't hold your breath. Move slowly and focus on control rather than speed. If you feel your back arching, stop and reset your position.
Exercise 6 – Superman Holds (Back Extensor Strength)
Superman holds strengthen your back extensors after you've built a solid foundation. This exercise comes in the strengthening phase, typically after three to four weeks of foundation work.
What it targets: Erector spinae, lower traps, and glutes
How to perform superman holds:
Lie face down on the floor with arms extended overhead. Keep your legs straight and together. Engage your core and glutes. Lift your arms, chest, and legs off the floor at the same time. Your body should form a gentle arc. Hold this position for 5 to 10 seconds. Lower back down with control. Rest for 5 seconds between repetitions.
Perform 8 to 10 holds for 2 sets, 2 to 3 times weekly.
Timing: Only after 3–4 weeks of foundation work
Don't attempt this exercise in the acute or early subacute phases. Your back extensors need to work hard during superman holds. Doing this too early can overload healing tissue and cause a setback. Wait until you can perform exercises 1 through 5 with no pain before adding superman holds.
Start with shorter holds (3 to 5 seconds) and gradually increase the time as you get stronger. Keep your neck in a neutral position by looking down at the floor. Don't hyperextend your neck by looking forward.
Exercise 7 – Wall Sits (Functional Endurance)
Wall sits build functional endurance in the muscles that support your spine during daily activities. This exercise prepares you for prolonged standing, walking, and physical tasks.
What it targets: Quads, glutes, and spinal stabilizers
How to perform wall sits:
Stand with your back against a wall. Walk your feet out about two feet from the wall. Slide your back down the wall until your knees are bent at 90 degrees. Your thighs should be parallel to the floor. Keep your back flat against the wall. Hold this position for 20 to 45 seconds. Stand back up by pressing through your heels. Rest for 30 to 60 seconds between repetitions.
Perform 3 to 5 repetitions, 2 to 3 times weekly.
Why endurance matters for daily activities:
. Your spinal stabilizers need to work all day long to support your posture. When these muscles get tired, your spine loses support and poor movement patterns take over. Building endurance helps your back stay protected during long work days, extended standing, or repetitive tasks.
Start with shorter holds (20 seconds) if needed. Gradually increase your hold time as you build endurance. Keep breathing normally throughout the hold. If your knees hurt, reduce the depth of your squat slightly.
Side Planks (Lateral Core Stability)
Side planks strengthen the muscles that stabilize your spine from the side. This exercise improves your ability to resist twisting, sagging, and collapsing through the trunk during daily activities.
What it targets: Obliques, deep core stabilizers, glute medius, and lateral hip muscles
How to perform side planks:
• Lie on your side with your elbow directly under your shoulder.
• Stack your legs straight, or bend your knees slightly for an easier version.
• Lift your hips off the floor, creating a straight line from your head to your feet (or knees).
• Keep your ribs stacked, avoid twisting, and keep your neck long.
• Hold this position for 15 to 30 seconds per side.
• Lower your hips back down with control and switch sides.
• Rest for 30 to 45 seconds between repetitions.
Perform 3 repetitions per side, 2 to 3 times weekly.
Why lateral stability matters for daily activities:
Your core doesn't just brace forward and backward—it needs to resist side bending and rotation every time you carry groceries, reach, lift uneven loads, or stabilize during walking and running. Weak lateral stabilizers force your spine and hips to compensate, increasing strain on your low back. Building side-to-side stability helps keep your spine supported during everyday movement and reduces injury risk.
Tips:
Start with shorter holds (15 seconds) if needed.
Keep your hips high—avoid letting them sag toward the floor.
If your shoulder feels strained, bring your knees down and perform the modified version.
When to See a Kinesiologist (Red Flags + Next Steps)
Some back pain requires professional assessment before you start exercises on your own. Watch for these signs that you should see a kinesiologist:
- Pain radiating down one or both legs
- Numbness, tingling, or weakness in your legs or feet
- Pain that worsens at night or doesn't improve with position changes
- Pain lasting longer than eight weeks despite rest and home exercises
- Pain following significant trauma like a fall or car accident
See your doctor immediately if you experience:
- Changes in bladder or bowel control
- Unexplained weight loss along with back pain
- History of cancer with new back pain
Even without red flags, working with a kinesiologist offers clear benefits. We assess your specific movement patterns and identify compensation patterns you can't see yourself. A kinesiologist creates a program matched to your exact phase of recovery and your body's unique needs. We also help you progress safely without setbacks.
During your initial assessment at Symmetrix Kinesiology, we evaluate how your spine moves, test your strength and stability, and identify which muscles are weak or tight. We design a personalized exercise program based on your findings. Most clients see us one to two times weekly for six to eight weeks. "A kinesiologist can really help the person figure out where they're at, what are the exercises that are most appropriate for them," says Dasha.
Schedule your back rehabilitation consultation at Symmetrix Kinesiology.
Written By
.jpg)
.jpg)


